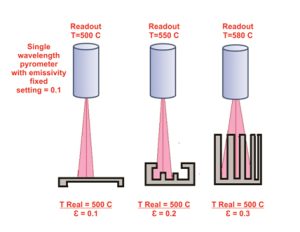
Accuracy of temperature measurement in Aluminium profiles by using Infrared Non-contact pyrometer depends on the emissivity of the surface. Due to high reflection emissivity of the profile surface is naturally very low. Also emissivity is not really a constant, and it can vary from profile to profile. Cavities tend to have a higher emissivity due to the multiple reflections between the surfaces. Therefore different shapes of profiles (although they belong to same Alloy family) have different emissivities. Please refer the following example.
From the above example it is clear that flat surfaces although has low emissivty ( e=0.1%) T real and single colour pyrometer read out was same. Single colour pyrometers are working with a pre-set emissivity. It has no facility to follow the changing emissivity of the surfaces. Therefore in second and third condition single colour pyrometer started giving wrong temperature readings.

That’s why special multiwavelength pyrometer with pre-set algorithm is used for accurate temperature measurement of aluminium profiles.
Is it possible (with 3T pyrometers) to give them the condition to register this temperature (after the quench box ) and if it is lower than 200C, to register that it was lower than 200C ? They need to register it for each extruded billet.
In order to go to low temperatures, we are using in this device thermal electrical cooled detector.
So, as per datasheet of our pyrometer – it is able to measure 200C when emissivity≥0.1.
For flat bright surface emissivity =0.04-0.05. And accordingly – minimal measured real temperature will be 245C.
For more complicated shape where ε=0.1-0.12 we can reach 200C.
Of course, with very dark object we will be able to measure even 150C, but it’s not our case….
Also very important reflected light, because off low temperature and very low signals.
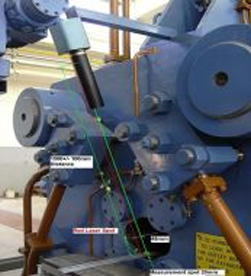
Pyrometer should be fully aimed into the profile with considering that from 1.5m distance we have measurement spot about 30mm. Otherwise we will have energy loss and Tmin will be higher as well.
Please check for all possible interference between camera lens and spot measurement, A3000 pyrometers measurement spot center is parallel to laser pointer with 48 mm span and 25mm span for PS3000.

Italian :Misurate temperatura troppo bassa
Russian :Измеряемая т-ра слишком низкая
Turkish :Ölçülen sıcaklık çok düşük
Technical question from our customer, sensor can’t show the temperature and we got message ” Err 80″ from display.
Please advise us why we got this message and how to solve this problem, thank you
This error is described in the “A3000 V1.5 item 4.1.4 No Calibration Indication”.
1. First check if the sensor works with group No1. If it doesn’t, switch to group No1 (see “SD3000_App_A” item 3.3 Camera Group Selection)
2. Switch the sensor to “Analytical” mode (see “SD3000_App_A” item 3.2 Camera Mode Switch)
We don’t recommend using AE3000 (standard “press exit” application) in the “Discrete” mode.
Please, adjust DY analytical coefficients if needed.
Comparing with the thermocouple, there is a difference of 50ºC, the Pirometer measures higher temp.
The termocouple was calibrated recently.
What is the thermocouple type? We need it in order to verify response time of thermocouple. (When you have slow response it is impossible to measure real temperature, as at the time thermocouple response profile temperature is all ready lower then real on press mouth.)
580 C is not unique; we have seen many aluminum extrusion presses worldwide where real temperature is 580C.
What is the emissivity? in many some cases high temperature indicate on reflection and that can be sometime analyze from emissivity, kindly send us a table of 3-4 measurement with thermocouple, pyrometer and emissivity data.
From picture sent we think that there is a lamp nearby projected on profile, please turn off while measurement.
Different types of T/C has different features, Please see attached pictures. Here you can see the difference between different heads to ANRITSU. It always has full attachment to profile, even when operator keeps the handle by light angle. Also other types may be too slow for moving profile measurements, and ANRITSU has time constant about 1sec.
Please avoid strong light illumination in the area of pyrometers’ measurements.
When emissivity is 0.1-0.2, the reflectivity is 0.9 – 0.8. It means that we “mirror” surface and a lot of external light coming to pyrometer through the surface. And additional amount of energy influence to results of measurements. This influence could rise with emissivity dropping down.
Shielding measurement spot from all source of external light, (sun light and artificial light) will normally solve the problem
Response time of the pyrometer is automatically calculated or is there a parameter that we can fine tune? How is pyrometer parameters setting is influenced by process speed?
Response time is a changeable parameter which you can set via SD3000 application SW (screen “Parameters”, “Tau” –Average number).
Actually you can change it from 0.051sec to 10sec.
Default setting before shipping for specific applications : for example For Press – 0.51Sec, for billets – 0.102Sec.
If the process is not too fast, we set it maximal possible value, because with higher “Tau” instrument is performing more averages.
Another parameter affecting to reaction time – “Moving average”. When process is slow – we set it 6, for fast measurements – working without it (set 1).
Russian :Значение измеряемой температуры очень высокое
Taiwanese :測得的溫度過高
Chinese :测得的温度过高
We are having some problems with your PS 3000 scanner, it does not scan automatically, it goes in maximum position on one side, but wont go back.
Could you suggest me how to handle this, should I send it to you for repair.
When I press scan button it rotates to maximum position on one side, but does not go back, it stays in maximum position. We cann rotate it manualy and find the temperature,everything is working fine except that.
Please follow instruction at user manul chapter 3.5.3 (Scanning range instruction), it may that both left and right virtual limit are set to one point.
Turkish :Ölçülen sıcaklık çok yüksek
Pyrometer based on Si – means that this pyrometer has Photo detector build with Si, and filters are in the range of 900-1000 nm; Temperature range 450-3200°C.
Pyrometer based on InGaAs has InGaAs detector, working with filters in range of 1300-1600nm and temperature range 300-1000°C (or possible modification 500-1500°C).
Pyrometer with InGaAs Extended detector has filters in range of 2100-2600nm; temperature range 100-1000°C.
In order to give an answer regarding ability to measure temperature in any process we should have any process description, system sketch, layout etc Because there are too many different accompanying conditions must be taken into consideration:
1. Infrared pyrometer may measure temperature of the surface which is in field of view; In case surface of metal is covered by some layer which has another temperature – it is not possible to measure the temperature below this layer.
2. Some dross or foam may appear on the surface of ingot, and this structure has completely different optical properties and due to lower thermal conductivity pyrometer read much lower temperature.
3. Pyrometer measure temperature at particular spot on the surface and it is enough that it will covered even partly by some thin layer for getting readout with error (see picture below).
4. The main condition for successful measurements – surface should be free and open. Thin oxidation layer on aluminium surface will not create problem.
There shouldn’t be a problem in measuring flat surface and shrinkage cavity with same calibration setup. Main property of our pyrometer allows to use it in industrial process is the ability of self-correction for emissivity changes. As a sample please sees attached diagram of different extrusion profiles has been measured with the same calibration setup.
As you can see that the differences here are much more significant than in ingots surface. The main condition – pyrometer should look on the measured surface and not on the dross/foam layer which has completely different temperature than AL and completely different optical properties.
Following problem may occur during the measurement of melting aluminum with noncontact pyrometer
a) It may measure temperature of slag which is completely different of metal.
b) Optical properties of slag are different from optical properties of molten aluminum surface, so the pyrometer, being calibrated for aluminum will give wrong result on another object.
c) One more factor may affect the measurements –hot walls surrounding, flames etc. Even in case the AL surface is clean, it has very high reflection and all hot surrounding may reflect from the surface and influence on pyrometer reading.
Two wavelength pyrometer which is using special algorithm is suitable for measurement of temperature of melting aluminum. Under heavy dust conditions in the furnace, our pyrometer may reduce 2% of temperature readout when transmittance of intermediate will be changed 50%.
+91 9358443001
enquiry@astinfrared.com
© 2024 Accurate Sensing Technologies – All Rights Reserved
"*" indicates required fields